How to create a lighting diagram…

Lighting diagrams can be used for many purposes. They allow you to keep track of your lighting set up if you need to recreate the same scenario in the future and can also be used by your assistants to set up a lighting scene that you have in your mind. I am aware of two main websites where you can create a lighting scenario/diagram:

www.strobox.com & www.lightingdiagrams.com & www.sylights.com (here you can also add a comment to your diagram which I find very useful).

I have used Strobox to create my diagram (remark: Online Lighting Diagram Creator and Strobox Community cooperate together in order to offer the photography community the best of both their tools). If you want to give it it go, follow the instructions below:

On the home page click on the Create tab and this will open a new diagram with basic objects (backdrop, subject, flashgun, umbrella and camera). You can choose to clear the diagram above the canvas and start creating your own or simply adjust the given diagram (add/delete objects). To choose new objects place your mouse over the “Lighting Objects’ tab on the left side of the canvas and choose the objects which suit your scenario. There is a disadvantage that you cannot record the distances of the objects from each other, but you can keep those in your notes as the distance is very critical in lighting scenarios. In addition, the light power cannot be logged.

lighting-diagram-1407572847

© Gina D Photo Pty Ltd 2014

Bar Contessa – New York City style Cafe/Restaurant in Balmain

I study for Diploma of Photo Imaging at CATC Design School and currently one of my subjects is Light & Lighting. Our main assignment was choose a local café or restaurant and seek permission from the owner to photograph the interior and exterior. The idea of the shoot was to capture the mood and ambiance of the café/restaurant and to make the establishment look at its best (as for an imaginary magazine review). Whilst the subject matter and the composition of the shots was paramount, the use of light and lighting techniques was of the utmost importance.


Choosing the right place:

It was easy to choose a local Café/Restaurant as I have my favourite place – Bar Contessa which is located in Balmain (I live on the boarder of Rozelle and Balmain). It is open 7 days a week from early morning until 3pm, so people go there for breakfast, lunch or just a coffee. The owner and chef is Marco Adoncello who has Italian roots but has travelled the world and his cuisine is a mixture of American and Italian dishes. Lots of products are sourced from friends and family who operate a range of fruit, vegetable and butcher businesses within Sydney. The free range eggs are delivered directly from a farm on the Hawksberry River. Their bread and sweets are delivered fresh every morning from the Luxe Bakery. The restaurant also offers gluten free, vegetarian and organic food to satisfy every customer. Marco & other people working in the restaurant are very friendly, so getting the approval to photograph my assignment at this place was very easy. I have promised to give them the photos for use for their promotional purposes.

Also you can have a look at their website BAR CONTESSA, or go grab some breakfast / lunch / coffee there!

Planning the photoshoot:

After receiving consent from the owner, I started planning my shoot. The entrance of the bar is facing south and it does not get any direct sun throughout the day. I have decided to shoot in the afternoon between 2-3pm because the bar closes at 3pm but it gets lots of light coming in bouncing from the building across the street to ensure there will be sufficient light to shoot. I did not plan to use any lighting as the shooting was planned during the working hours and I did not want to distract the guests or disturb the functioning in any way. I prepared a tripod and monopod to be able to use longer exposure and avoid camera shake. I decided to use my Canon lens 24 – 105mm as that is the widest lens I own. For interior photos I planned to use 24mm (f 11 -18) and for product photography as coffee, food etc. lower f stop – this lens goes down to f4 only. There might be better lens option for food photography but using one lens only gave me a bit of flexibility to change the subject quickly.

On the job:

As agreed with Marco (the owner & chef) I arrived on Sunday afternoon. I ordered a burger which was one of my subjects to shoot (see below) – have to admit it tastes as well as it looks. The plan was to get 3-4 photos for this assignment but I have added a bit more to show more of the work I have done. I used a tripod for the interior photos and the product photographs were taking while hand holding the camera. Even though it could be better to use a tripod, I did not want to attract too much attention & disturb the functionality of the restaurant. Tripod for the interior photographs was not used only to let enough light in due to limited lighting conditions but also to blur some movement (which makes the place look busy and people should not be recognised on such photos unless they agreed to it). I have tried to include guests in the background in some of the food/coffee photographs to make the photos more life, social (photo number 2 and 4 below).

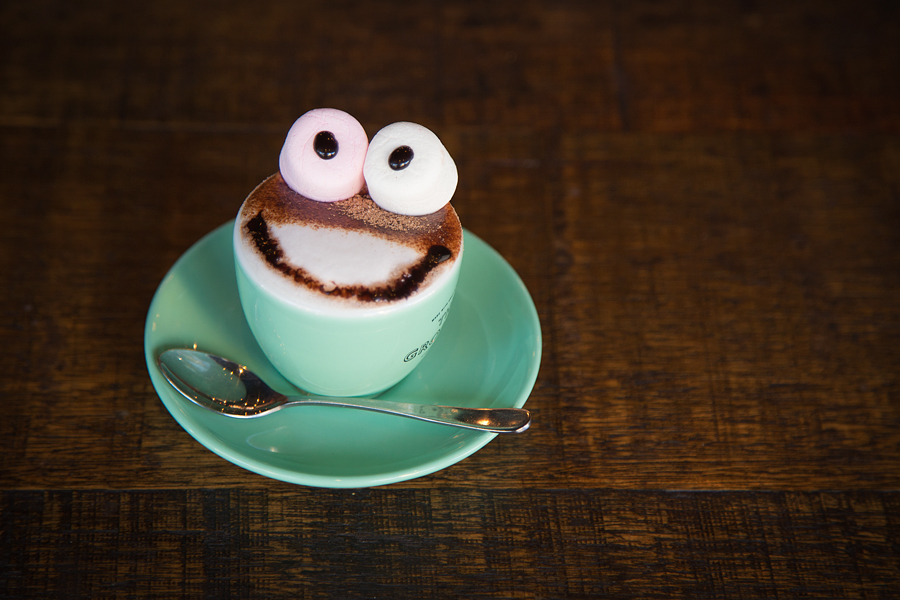
Below are the results including settings. Hope you like them. I would like to thank Marco for the opportunity (and supplying me with different coffees for my shoot, especially the smiley face – Babyccino (Photo Nr.7).

1. Settings: f16, ISO 320, 1/2sec.

1. Settings: f16, ISO 320, 1/2sec.

2. f4, ISO 320, 1/10sec.

2. f4, ISO 320, 1/10sec.

3. Settings: f16, ISO 100, 3.2sec.

3. Settings: f16, ISO 100, 3.2sec.

4. Settings: f4, ISO 640, 1/60sec.

4. Settings: f4, ISO 640, 1/60sec.

5. Settings: f4, ISO 1000, 1/80sec.                                                                                                                                                                                     6. Settings: f4, ISO 400, 1/125sec.

5. Settings: f4, ISO 1000, 1/80sec.                                                                                                                                                                          6. Settings: f4, ISO 400, 1/125sec.

7. Settings: f4, ISO 400, 1/80sec.

7. Settings: f4, ISO 400, 1/80sec.


© Gina D Photo Pty Ltd 2014


My first blog….

The purpose of this blog is to post my weekly assignments during my studies at CATC Design School where I study 2 years course ending with Diploma of Photo Imaging.

More photos from my work are available on my website: www.ginadphoto.com